本文所列内容在Linode和Vultr的VPS上面均测试通过。
1,简介与说明
ISPConfig是Linux系统上最强大的免费开源控制面板,没有之一。就像他的名字一样,是为ISP(Internet Service Provider)应用场景所开发的,支持多服务器,支持多个流行的服务程序。本文将带领读者来安装配置一台基于Debian Wheezy操作系统,使用Apache2、Bind、Dovecot、PureFTPD以及一些辅助程序构建完整的主机服务平台。
本文假设您已经完全按照《手把手教你安装Debian系统》一文安装了操作系统,同时本文因为是示例,所以主机名使用server1.example.com,与之对应的IP是192.168.0.100,您已经配置好或者在安装时就已经设置好网络、DNS等,并且能够正常使用。
2,更新系统
执行下列命令:
apt-get update
apt-get upgrade
3,更改默认的Shell
/bin/sh是连接到 /bin/dash的,但是我们需要的是/bin/bash, 而不是/bin/dash,这里必须更改,否则ISPConfig会安装失败,执行命令:
dpkg-reconfigure dash
回显:
Use dash as the default system shell (/bin/sh) <-- No 在这里输入No
4,同步系统时钟/时间(可选,推荐)
这是一个建议,你也可以跳过这一步
apt-get install ntp ntpdate
5,安装Postfix, Dovecot, MySQL, phpMyAdmin, rkhunter, binutils
一行命令搞定:
apt-get install postfix postfix-mysql postfix-doc mysql-client mysql-server openssl getmail4 rkhunter binutils dovecot-imapd dovecot-pop3d dovecot-mysql dovecot-sieve sudo
中途会要求你输入一些信息,如下所示:
General type of mail configuration: <-- Internet Site
System mail name: <-- server1.example.com
New password for the MySQL "root" user: <-- MySQL的Root密码
Repeat password for the MySQL "root" user: <-- 重复输入密码
然后我们来编辑Postfix的设置文件:
nano /etc/postfix/master.cf
其中要编辑的是下面几行:
submission inet n       -       -       -       -       smtpd
  -o syslog_name=postfix/submission
  -o smtpd_tls_security_level=encrypt
  -o smtpd_sasl_auth_enable=yes
  -o smtpd_client_restrictions=permit_sasl_authenticated,reject
#  -o milter_macro_daemon_name=ORIGINATING
smtps     inet  n       -       -       -       -       smtpd
  -o syslog_name=postfix/smtps
  -o smtpd_tls_wrappermode=yes
  -o smtpd_sasl_auth_enable=yes
  -o smtpd_client_restrictions=permit_sasl_authenticated,reject
#  -o milter_macro_daemon_name=ORIGINATING
重启Postfix:
/etc/init.d/postfix restart
编辑MySQL配置文件:
nano /etc/mysql/my.cnf
做如下更改:
bind-address    = 127.0.0.1  #取消这一行的注释
max_allowed_packet = 500M        #添加这一行
然后重启MySQL:
/etc/init.d/mysql restart
6,安装Amavisd-new, SpamAssassin, And Clamav
这里我将命令合并了,复制即可:
apt-get install -y amavisd-new spamassassin clamav clamav-daemon zoo unzip bzip2 arj nomarch lzop cabextract apt-listchanges libnet-ldap-perl libauthen-sasl-perl clamav-docs daemon libio-string-perl libio-socket-ssl-perl libnet-ident-perl zip libnet-dns-perl
/etc/init.d/spamassassin stop
update-rc.d -f spamassassin remove
7,安装Apache2, PHP5, phpMyAdmin, FCGI, suExec, Pear, And mcrypt
首先执行命令:
apt-get install apache2 apache2.2-common apache2-doc apache2-mpm-prefork apache2-utils libexpat1 ssl-cert libapache2-mod-php5 php5 php5-common php5-gd php5-mysql php5-imap phpmyadmin php5-cli php5-cgi libapache2-mod-fcgid apache2-suexec php-pear php-auth php5-mcrypt mcrypt php5-imagick imagemagick libapache2-mod-suphp libruby libapache2-mod-ruby libapache2-mod-python php5-curl php5-intl php5-memcache php5-memcached php5-ming php5-ps php5-pspell php5-recode php5-snmp php5-sqlite php5-tidy php5-xmlrpc php5-xsl memcached
中途有两个交互:
Web server to reconfigure automatically: <-- apache2
Configure database for phpmyadmin with dbconfig-common? <-- No
然后启用相关的模块,命令:
a2enmod suexec rewrite ssl actions include dav_fs dav auth_digest
下面来编辑/etc/apache2/mods-available/suphp.conf文件:
nano /etc/apache2/mods-available/suphp.conf
做如下更改:
<IfModule mod_suphp.c>
    #<FilesMatch "\.ph(p3|tml)$">  #这一部分注释掉
    #    SetHandler application/x-httpd-suphp
    #</FilesMatch>

#然后添加:
        AddType application/x-httpd-suphp .php .php3 .php4 .php5 .phtml
        suPHP_AddHandler application/x-httpd-suphp

    <Directory />
        suPHP_Engine on
    </Directory>

    # By default, disable suPHP for debian packaged web applications as files
    # are owned by root and cannot be executed by suPHP because of min_uid.
    <Directory /usr/share>
        suPHP_Engine off
    </Directory>

# # Use a specific php config file (a dir which contains a php.ini file)
#       suPHP_ConfigPath /etc/php5/cgi/suphp/
# # Tells mod_suphp NOT to handle requests with the type <mime-type>.
#       suPHP_RemoveHandler <mime-type>
</IfModule>
编辑mime:
nano /etc/mime.types
注释掉下面一行:
#application/x-ruby rb
重启Apache2:
/etc/init.d/apache2 restart
8,安装Xcache
Xcache 是一个加速php代码的东东,安装很简单:
apt-get install php5-xcache
/etc/init.d/apache2 restart
9,安装PHP-FPM
从ISPConfig 3.0.5版本开始,有一个额外的PHP模式可以选择:PHP-FPM,安装很简单:
apt-get install libapache2-mod-fastcgi php5-fpm
a2enmod actions fastcgi alias
/etc/init.d/apache2 restart
10,安装Mailman
命令:
apt-get install mailman
两次交互:
Languages to support: <-- en (English)
Missing site list <-- Ok
首先来建立一个邮件列表:
newlist mailman
交互情况如下:
root@server1:~# newlist mailman
Enter the email of the person running the list: <-- 邮件列表的管理邮箱,比如listadmin@example.com
Initial mailman password: <-- 邮件列表的管理密码
To finish creating your mailing list, you must edit your /etc/aliases (or
equivalent) file by adding the following lines, and possibly running the
`newaliases' program:

## mailman mailing list
mailman:              "|/var/lib/mailman/mail/mailman post mailman"
mailman-admin:        "|/var/lib/mailman/mail/mailman admin mailman"
mailman-bounces:      "|/var/lib/mailman/mail/mailman bounces mailman"
mailman-confirm:      "|/var/lib/mailman/mail/mailman confirm mailman"
mailman-join:         "|/var/lib/mailman/mail/mailman join mailman"
mailman-leave:        "|/var/lib/mailman/mail/mailman leave mailman"
mailman-owner:        "|/var/lib/mailman/mail/mailman owner mailman"
mailman-request:      "|/var/lib/mailman/mail/mailman request mailman"
mailman-subscribe:    "|/var/lib/mailman/mail/mailman subscribe mailman"
mailman-unsubscribe:  "|/var/lib/mailman/mail/mailman unsubscribe mailman"

Hit enter to notify mailman owner... <-- 回车

root@server1:~#
编辑一下/etc/aliases文件:
nano /etc/aliases
添加下面内容:
## mailman mailing list
mailman:              "|/var/lib/mailman/mail/mailman post mailman"
mailman-admin:        "|/var/lib/mailman/mail/mailman admin mailman"
mailman-bounces:      "|/var/lib/mailman/mail/mailman bounces mailman"
mailman-confirm:      "|/var/lib/mailman/mail/mailman confirm mailman"
mailman-join:         "|/var/lib/mailman/mail/mailman join mailman"
mailman-leave:        "|/var/lib/mailman/mail/mailman leave mailman"
mailman-owner:        "|/var/lib/mailman/mail/mailman owner mailman"
mailman-request:      "|/var/lib/mailman/mail/mailman request mailman"
mailman-subscribe:    "|/var/lib/mailman/mail/mailman subscribe mailman"
mailman-unsubscribe:  "|/var/lib/mailman/mail/mailman unsubscribe mailman"
执行命令:
newaliases
/etc/init.d/postfix restart
ln -s /etc/mailman/apache.conf /etc/apache2/conf.d/mailman.conf
/etc/init.d/apache2 restart
/etc/init.d/mailman start
上面这些命令将会在Apache2所有的虚拟主机上建立一个地址为/cgi-bin/mailman/的虚拟目录,你可以使用地址为http://<vhost>/cgi-bin/mailman/admin/<listname>进行邮件列表管理,可以在http://<vhost>/cgi-bin/mailman/listinfo/<listname>看到列表信息,可以在http://<vhost>/pipermail看到列表的内容
11,安装PureFTPd和Quota
安装并且编辑配置文件:
apt-get install pure-ftpd-common pure-ftpd-mysql quota quotatool
nano /etc/default/pure-ftpd-common
编辑下面两行:
STANDALONE_OR_INETD=standalone
[...]
VIRTUALCHROOT=true
普通的FTP是明文的,所以密码很容易被人获取,所以我们可以配置加密连接:
echo 1 > /etc/pure-ftpd/conf/TLS
mkdir -p /etc/ssl/private/
openssl req -x509 -nodes -days 7300 -newkey rsa:2048 -keyout /etc/ssl/private/pure-ftpd.pem -out /etc/ssl/private/pure-ftpd.pem
交互内容:
Country Name (2 letter code) [AU]: <-- 输入国家缩写 (比如CN).
State or Province Name (full name) [Some-State]: <-- 输入省份名称
Locality Name (eg, city) []: <-- 输入城市名称
Organization Name (eg, company) [Internet Widgits Pty Ltd]: <-- 输入组织名称,比如公司名
Organizational Unit Name (eg, section) []: <-- 输入组织内的部门名称,比如IT Suport
Common Name (eg, YOUR name) []: <-- 输入服务器主机名,本文中是"server1.example.com"
Email Address []: <-- 输入你的邮件地址.
接下来使FTP服务器重启并接受加密连接,同时编辑fstab文件准备启用配额,执行命令:
chmod 600 /etc/ssl/private/pure-ftpd.pem
/etc/init.d/pure-ftpd-mysql restart
nano /etc/fstab
在根卷/的挂载位置加入内容usrjquota=quota.user,grpjquota=quota.group,jqfmt=vfsv0,像下面这样:
# /etc/fstab: static file system information.
#
# Use 'blkid' to print the universally unique identifier for a
# device; this may be used with UUID= as a more robust way to name devices
# that works even if disks are added and removed. See fstab(5).
#
# <file system> <mount point>   <type>  <options>       <dump>  <pass>
/dev/mapper/server1-root /               ext4    errors=remount-ro,usrjquota=quota.user,grpjquota=quota.group,jqfmt=vfsv0 0       1
# /boot was on /dev/sda1 during installation
UUID=46d1bd79-d761-4b23-80b8-ad20cb18e049 /boot           ext2    defaults        0       2
/dev/mapper/server1-swap_1 none            swap    sw              0       0
/dev/sr0        /media/cdrom0   udf,iso9660 user,noauto     0       0
最后让配额系统生效,执行命令:
mount -o remount /
quotacheck -avugm
quotaon -avug
12,安装Bind
执行命令:
apt-get install vlogger webalizer awstats geoip-database libclass-dbi-mysql-perl
接着编辑/etc/cron.d/awstats文件,并且屏蔽掉里面所有内容:
nano /etc/cron.d/awstats
内容像下面这样:
#MAILTO=root

#*/10 * * * * www-data [ -x /usr/share/awstats/tools/update.sh ] && /usr/share/awstats/tools/update.sh

# Generate static reports:
#10 03 * * * www-data [ -x /usr/share/awstats/tools/buildstatic.sh ] && /usr/share/awstats/tools/buildstatic.sh
13,安装Jailkit(可选)
这个东东是chroot用的,比如你想让用户能ssh登录服务器,然后运行一些基本命令的话可以用到,一般不推荐提供这样的权限,但为了“全能”,还是写下来。需要注意的是,这个必须在安装ISPConfig之前,否则无效。
命令合并在一起了:
apt-get install build-essential autoconf automake1.9 libtool flex bison debhelper binutils-gold
cd /tmp
wget http://olivier.sessink.nl/jailkit/jailkit-2.15.tar.gz
tar xvfz jailkit-2.15.tar.gz
cd jailkit-2.15
./debian/rules binary
cd ..
dpkg -i jailkit_2.15-1_*.deb
rm -rf jailkit-2.15*
14,安装fail2ban(可选,推荐)
这个在以前的文章《》已经介绍过了,推荐安装,如果你认为没必要,那么可以跳过这一节。
安装并且打开配置文件:
apt-get install fail2ban
nano /etc/fail2ban/jail.local
内容如下:
[pureftpd]
enabled  = true
port     = ftp
filter   = pureftpd
logpath  = /var/log/syslog
maxretry = 3

[dovecot-pop3imap]
enabled = true
filter = dovecot-pop3imap
action = iptables-multiport[name=dovecot-pop3imap, port="pop3,pop3s,imap,imaps", protocol=tcp]
logpath = /var/log/mail.log
maxretry = 5

[sasl]
enabled  = true
port     = smtp
filter   = sasl
logpath  = /var/log/mail.log
maxretry = 3
下面我们来建立两个过滤文件,第一个:
nano /etc/fail2ban/filter.d/pureftpd.conf
内容:
[Definition]
failregex = .*pure-ftpd: \(.*@<HOST>\) \[WARNING\] Authentication failed for user.*
ignoreregex =
第二个:
nano /etc/fail2ban/filter.d/dovecot-pop3imap.conf
内容:
[Definition]
failregex = (: pop3-login|imap-login): .*(:Authentication failure|Aborted login \(auth failed|Aborted login \(tried to use disabled|Disconnected \(auth failed|Aborted login \(\d+ authentication attempts).*rip=(P<host>\S*),.*
ignoreregex =
重启fail2ban:
/etc/init.d/fail2ban restart
15,安装SquirrelMail
这个是邮件系统的网页界面,还是必须要有的了,安装并且配置命令:
apt-get install squirrelmail
squirrelmail-configure
交互内容:
SquirrelMail Configuration : Read: config.php (1.4.0)
---------------------------------------------------------
Main Menu --
1.  Organization Preferences
2.  Server Settings
3.  Folder Defaults
4.  General Options
5.  Themes
6.  Address Books
7.  Message of the Day (MOTD)
8.  Plugins
9.  Database
10. Languages

D.  Set pre-defined settings for specific IMAP servers

C   Turn color on
S   Save data
Q   Quit

Command >> <-- D


SquirrelMail Configuration : Read: config.php
---------------------------------------------------------
While we have been building SquirrelMail, we have discovered some
preferences that work better with some servers that don't work so
well with others.  If you select your IMAP server, this option will
set some pre-defined settings for that server.

Please note that you will still need to go through and make sure
everything is correct.  This does not change everything.  There are
only a few settings that this will change.

Please select your IMAP server:
    bincimap    = Binc IMAP server
    courier     = Courier IMAP server
    cyrus       = Cyrus IMAP server
    dovecot     = Dovecot Secure IMAP server
    exchange    = Microsoft Exchange IMAP server
    hmailserver = hMailServer
    macosx      = Mac OS X Mailserver
    mercury32   = Mercury/32
    uw          = University of Washington's IMAP server
    gmail       = IMAP access to Google mail (Gmail) accounts

    quit        = Do not change anything
Command >> <-- dovecot


SquirrelMail Configuration : Read: config.php
---------------------------------------------------------
While we have been building SquirrelMail, we have discovered some
preferences that work better with some servers that don't work so
well with others.  If you select your IMAP server, this option will
set some pre-defined settings for that server.

Please note that you will still need to go through and make sure
everything is correct.  This does not change everything.  There are
only a few settings that this will change.

Please select your IMAP server:
    bincimap    = Binc IMAP server
    courier     = Courier IMAP server
    cyrus       = Cyrus IMAP server
    dovecot     = Dovecot Secure IMAP server
    exchange    = Microsoft Exchange IMAP server
    hmailserver = hMailServer
    macosx      = Mac OS X Mailserver
    mercury32   = Mercury/32
    uw          = University of Washington's IMAP server
    gmail       = IMAP access to Google mail (Gmail) accounts

    quit        = Do not change anything
Command >> dovecot

              imap_server_type = dovecot
         default_folder_prefix = <none>
                  trash_folder = Trash
                   sent_folder = Sent
                  draft_folder = Drafts
            show_prefix_option = false
          default_sub_of_inbox = false
show_contain_subfolders_option = false
            optional_delimiter = detect
                 delete_folder = false

Press any key to continue... <-- press a key


SquirrelMail Configuration : Read: config.php (1.4.0)
---------------------------------------------------------
Main Menu --
1.  Organization Preferences
2.  Server Settings
3.  Folder Defaults
4.  General Options
5.  Themes
6.  Address Books
7.  Message of the Day (MOTD)
8.  Plugins
9.  Database
10. Languages

D.  Set pre-defined settings for specific IMAP servers

C   Turn color on
S   Save data
Q   Quit

Command >> <-- S


SquirrelMail Configuration : Read: config.php (1.4.0)
---------------------------------------------------------
Main Menu --
1.  Organization Preferences
2.  Server Settings
3.  Folder Defaults
4.  General Options
5.  Themes
6.  Address Books
7.  Message of the Day (MOTD)
8.  Plugins
9.  Database
10. Languages

D.  Set pre-defined settings for specific IMAP servers

C   Turn color on
S   Save data
Q   Quit

Command >> <-- Q
下面我们要让SquirrelMail加在Apache2里面,但是配置文件在/etc/squirrelmail/apache.conf,所以Apache2是无法加载的,那么我们来做一个连接:
cd /etc/apache2/conf.d/
ln -s ../../squirrelmail/apache.conf squirrelmail.conf
/etc/init.d/apache2 reload
然后我们来编辑配置文件:
nano /etc/apache2/conf.d/squirrelmail.conf
添加一个虚拟目录的配置段:
<Directory /usr/share/squirrelmail>
  Options FollowSymLinks
  <IfModule mod_php5.c>
    AddType application/x-httpd-php .php
    php_flag magic_quotes_gpc Off
    php_flag track_vars On
    php_admin_flag allow_url_fopen Off
    php_value include_path .
    php_admin_value upload_tmp_dir /var/lib/squirrelmail/tmp
    php_admin_value open_basedir /usr/share/squirrelmail:/etc/squirrelmail:/var/lib/squirrelmail:/etc/hostname:/etc/mailname
    php_flag register_globals off
  </IfModule>
  <IfModule mod_dir.c>
    DirectoryIndex index.php
  </IfModule>

  # access to configtest is limited by default to prevent information leak
  <Files configtest.php>
    order deny,allow
    deny from all
    allow from 127.0.0.1
  </Files>
</Directory>
下面建立临时目录,并且设置属主:
mkdir /var/lib/squirrelmail/tmp
chown www-data /var/lib/squirrelmail/tmp
/etc/init.d/apache2 reload
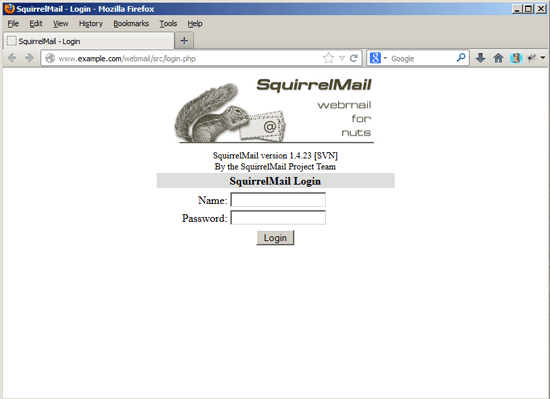
ok了,可以用下面两个地址浏览了:
http://192.168.0.100/squirrelmail
http://www.example.com/squirrelmail
如果你觉得这个目录名字太长或者不美观什么的,介绍一下修改方法:
nano /etc/apache2/conf.d/squirrelmail.conf
修改下面两行就行了:
Alias /squirrelmail /usr/share/squirrelmail
Alias /webmail /usr/share/squirrelmail
并且需要让Apache2重新加载配置:
/etc/init.d/apache2 reload
像我改成webmail就可以的:
或者你想用一个单独的域名来提供web界面的话,用下面这个办法:
nano /etc/apache2/conf.d/squirrelmail.conf
这样设置:
<VirtualHost 192.168.0.100:80>
  DocumentRoot /usr/share/squirrelmail
  ServerName webmail.example.com
</VirtualHost>
里面的IP和域名换成你的就好了。
记得要Apache2重新加载哦:
/etc/init.d/apache2 reload
16,安装ISPConfig 3
重头戏,却也是很简单的了。自动安装最新版本的命令是这样:
cd /tmp
wget http://www.ispconfig.org/downloads/ISPConfig-3-stable.tar.gz
tar xfz ISPConfig-3-stable.tar.gz
cd ispconfig3_install/install/
php -q install.php
所有的交互内容:
root@server1:/tmp/ispconfig3_install/install# php -q install.php
PHP Deprecated:  Comments starting with '#' are deprecated in /etc/php5/cli/conf.d/ming.ini on line 1 in Unknown on line 0


--------------------------------------------------------------------------------
 _____ ___________   _____              __ _         ____
|_   _/  ___| ___ \ /  __ \            / _(_)       /__  \
  | | \ `--.| |_/ / | /  \/ ___  _ __ | |_ _  __ _    _/ /
  | |  `--. \  __/  | |    / _ \| '_ \|  _| |/ _` |  |_ |
 _| |_/\__/ / |     | \__/\ (_) | | | | | | | (_| | ___\ \
 \___/\____/\_|      \____/\___/|_| |_|_| |_|\__, | \____/
                                              __/ |
                                             |___/
--------------------------------------------------------------------------------


>> Initial configuration

Operating System: Debian or compatible, unknown version.

    Following will be a few questions for primary configuration so be careful.
    Default values are in [brackets] and can be accepted with <ENTER>.
    Tap in "quit" (without the quotes) to stop the installer.


Select language (en,de) [en]: <-- 回车

Installation mode (standard,expert) [standard]: <-- 回车

Full qualified hostname (FQDN) of the server, eg server1.domain.tld  [server1.example.com]: <-- 回车

MySQL server hostname [localhost]: <-- 回车

MySQL root username [root]: <-- 回车

MySQL root password []: <-- MySQL的root密码

MySQL database to create [dbispconfig]: <-- 回车

MySQL charset [utf8]: <-- 回车

Generating a 4096 bit RSA private key
.............................................................++
.........................................................................................................................++
writing new private key to 'smtpd.key'
-----
You are about to be asked to enter information that will be incorporated
into your certificate request.
What you are about to enter is what is called a Distinguished Name or a DN.
There are quite a few fields but you can leave some blank
For some fields there will be a default value,
If you enter '.', the field will be left blank.
-----
Country Name (2 letter code) [AU]: <-- 回车
State or Province Name (full name) [Some-State]: <-- 回车
Locality Name (eg, city) []: <-- 回车
Organization Name (eg, company) [Internet Widgits Pty Ltd]: <-- 回车
Organizational Unit Name (eg, section) []: <-- 回车
Common Name (e.g. server FQDN or YOUR name) []: <-- 回车
Email Address []: <-- 回车
Configuring Jailkit
Configuring Dovecot
Configuring Spamassassin
Configuring Amavisd
Configuring Getmail
Configuring Pureftpd
Configuring BIND
Configuring Apache
Configuring Vlogger
Configuring Apps vhost
Configuring Bastille Firewall
Configuring Fail2ban
Installing ISPConfig
ISPConfig Port [8080]: <-- 回车

Do you want a secure (SSL) connection to the ISPConfig web interface (y,n) [y]: <-- 回车

Generating RSA private key, 4096 bit long modulus
.................................................................................................++
........++
e is 65537 (0x10001)
You are about to be asked to enter information that will be incorporated
into your certificate request.
What you are about to enter is what is called a Distinguished Name or a DN.
There are quite a few fields but you can leave some blank
For some fields there will be a default value,
If you enter '.', the field will be left blank.
-----
Country Name (2 letter code) [AU]: <-- 回车
State or Province Name (full name) [Some-State]: <-- 回车
Locality Name (eg, city) []: <-- 回车
Organization Name (eg, company) [Internet Widgits Pty Ltd]: <-- 回车
Organizational Unit Name (eg, section) []: <-- 回车
Common Name (e.g. server FQDN or YOUR name) []: <-- 回车
Email Address []: <-- 回车

Please enter the following 'extra' attributes
to be sent with your certificate request
A challenge password []: <-- 回车
An optional company name []: <-- 回车
writing RSA key
Configuring DBServer
Installing ISPConfig crontab
no crontab for root
no crontab for getmail
Restarting services ...
Stopping MySQL database server: mysqld.
Starting MySQL database server: mysqld ..
Checking for tables which need an upgrade, are corrupt or were
not closed cleanly..
Stopping Postfix Mail Transport Agent: postfix.
Starting Postfix Mail Transport Agent: postfix.
Stopping amavisd: amavisd-new.
Starting amavisd: amavisd-new.
Stopping ClamAV daemon: clamd.
Starting ClamAV daemon: clamd .
Restarting IMAP/POP3 mail server: dovecot.
[Tue May 07 02:36:22 2013] [warn] NameVirtualHost *:443 has no VirtualHosts
[Tue May 07 02:36:22 2013] [warn] NameVirtualHost *:80 has no VirtualHosts
[Tue May 07 02:36:23 2013] [warn] NameVirtualHost *:443 has no VirtualHosts
[Tue May 07 02:36:23 2013] [warn] NameVirtualHost *:80 has no VirtualHosts
Restarting web server: apache2 ... waiting .
Restarting ftp server: Running: /usr/sbin/pure-ftpd-mysql-virtualchroot -l mysql:/etc/pure-ftpd/db/mysql.conf -l pam -H -O clf:/var/log/pure-ftpd/transfer.log -Y 1 -D -u 1000 -A -E -b -8 UTF-8 -B
Installation completed.
root@server1:/tmp/ispconfig3_install/install#很简单,除了密码,一路回车就行。程序会自动配置所有的服务,你还可以让程序建立一个SSL站点来登录面板,方法是当你看到Do you want a secure (SSL) connection to the ISPConfig web interface (y,n) [y]的时候,敲回车……
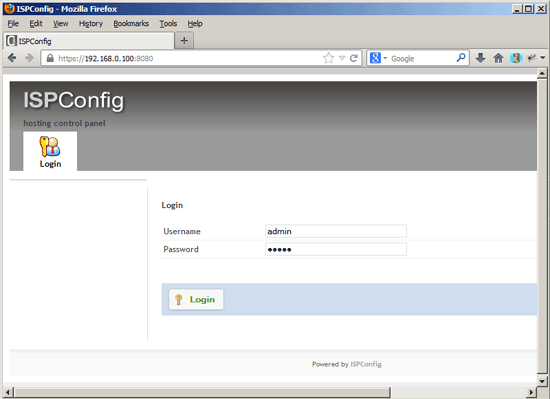
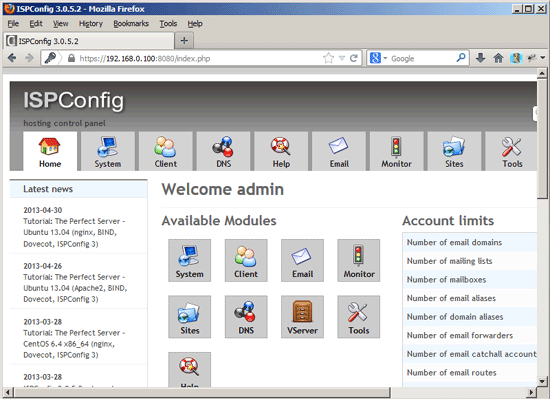
现在你可以使用http(s)://server1.example.com:8080或者http(s)://192.168.0.100:8080来登录面板了,默认的用户名和密码都是admin,来观摩一下吧: